 Save
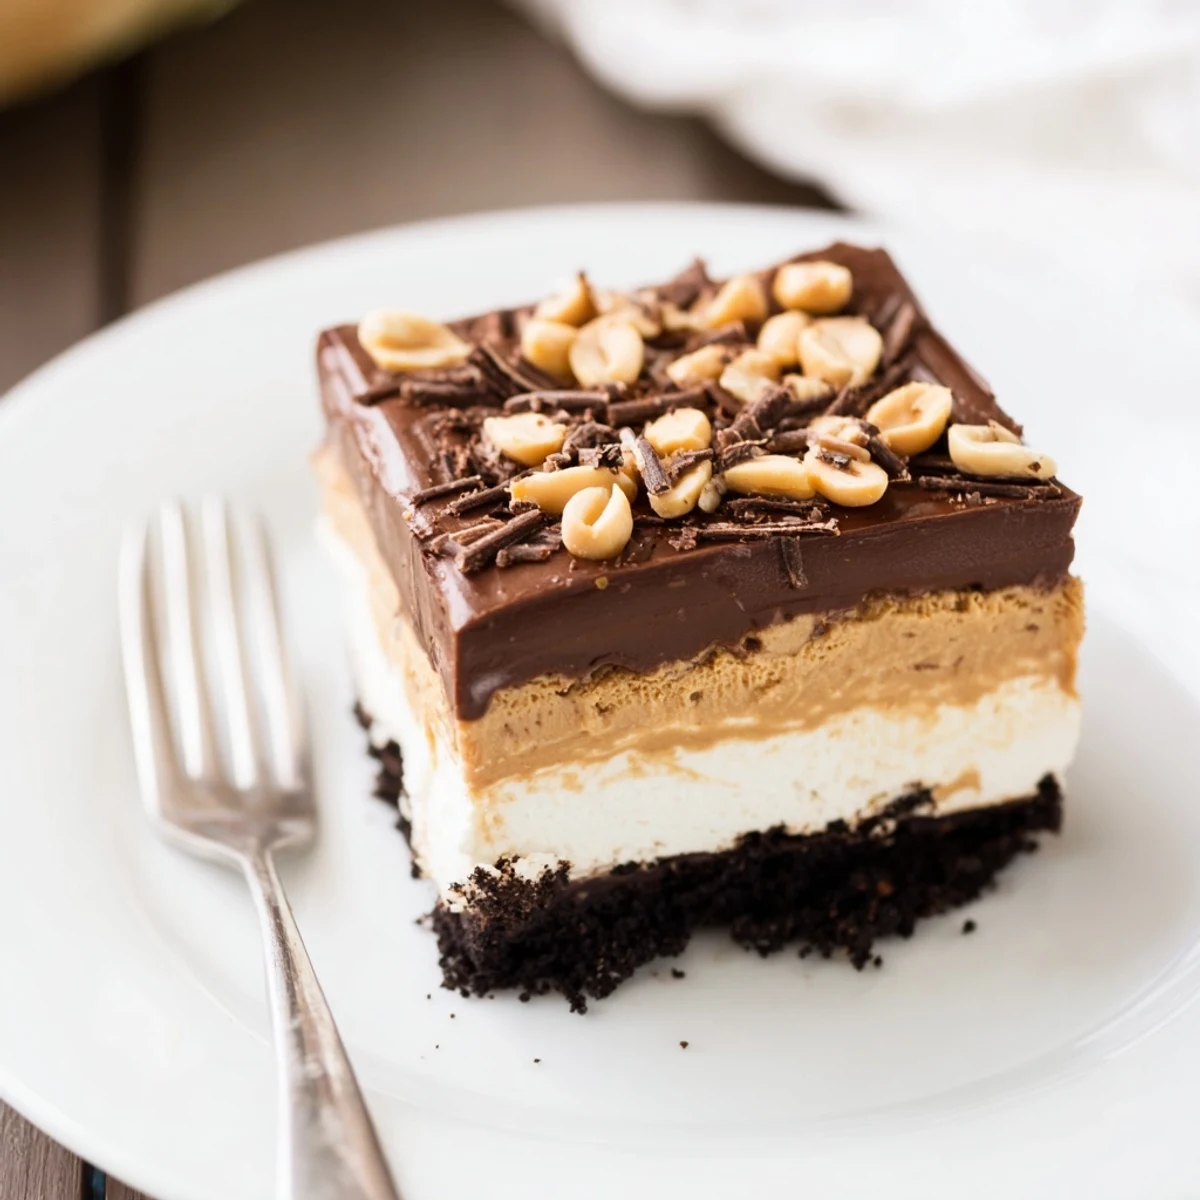
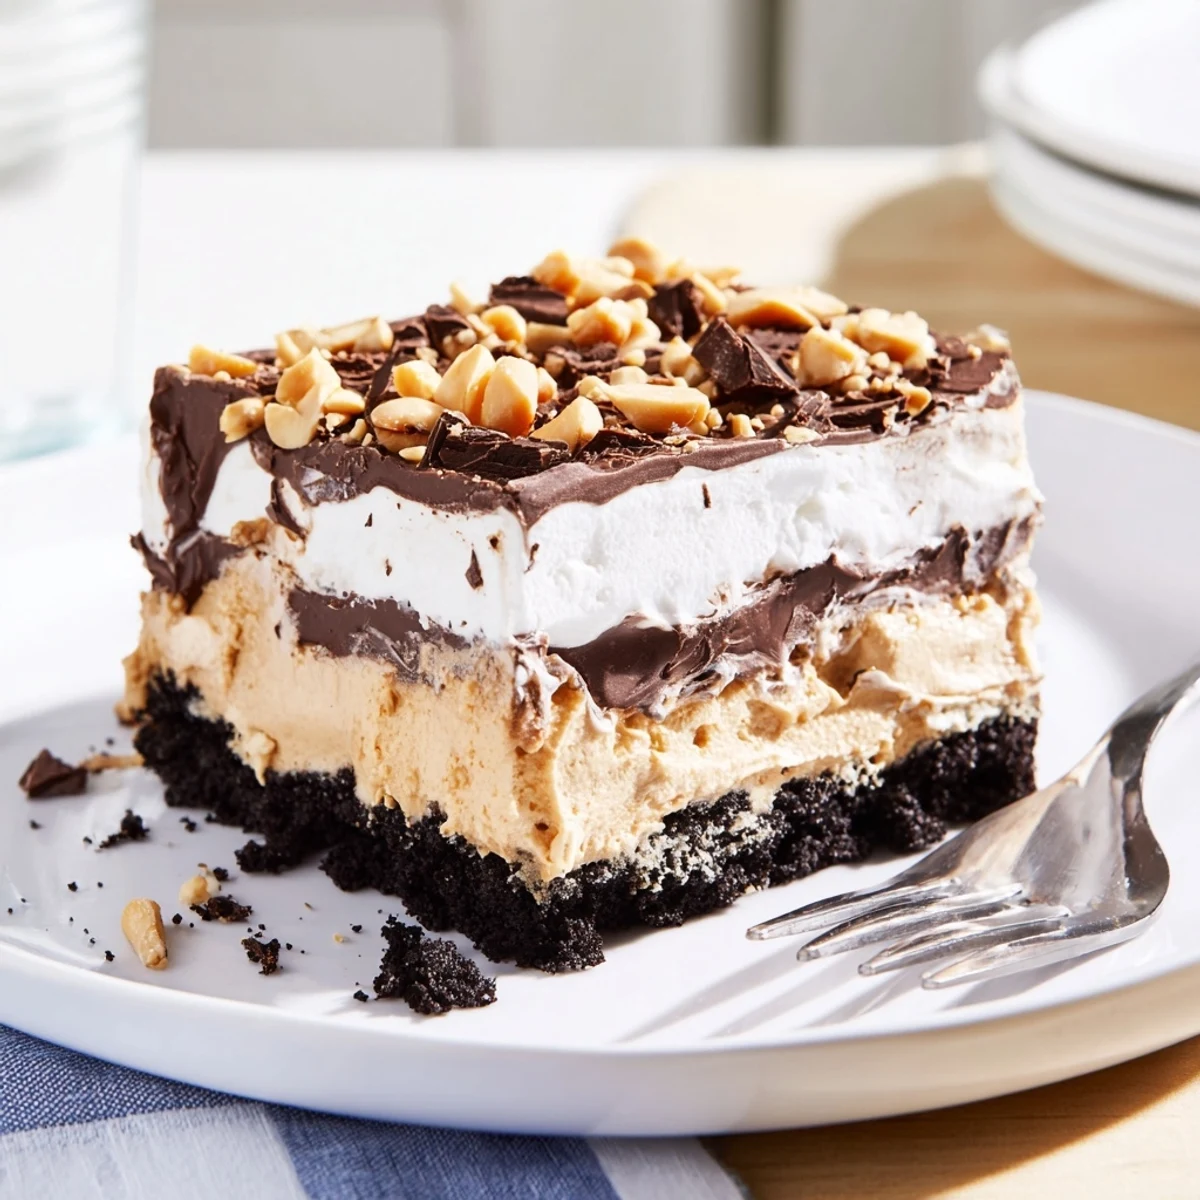
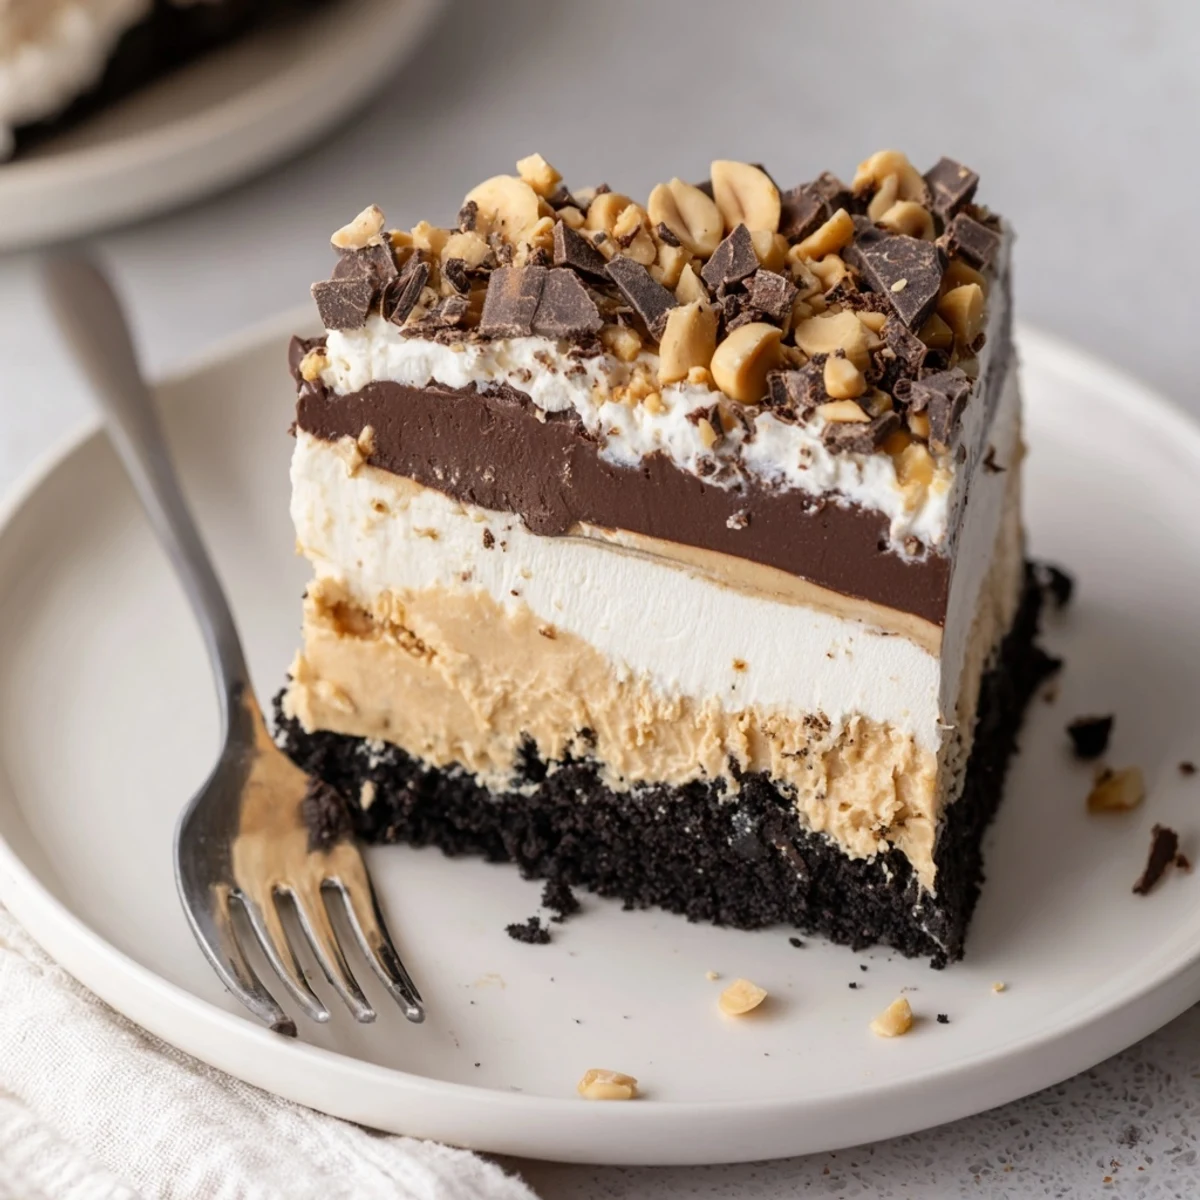
Save This no-bake peanut butter layered delight is a dreamy dessert built on a crunchy chocolate cookie crust. A velvety cream cheese and peanut butter mousse sits beneath a rich chocolate ganache layer, all crowned with fluffy whipped topping.
Ready in just 25 minutes of prep time, it chills in the fridge for 4 hours to set perfectly. With only simple ingredients and no oven required, it's an effortless yet impressive treat for gatherings, holidays, or satisfying a peanut butter craving.
My sister brought this dessert to our Fourth of July cookout three years ago, and I watched every single adult at the table go back for seconds while the fireworks crackled overhead. There is something about the combination of peanut butter and chocolate that makes people lose all restraint, myself included. I begged her for the recipe on the spot, and it has been in my regular rotation ever since. No oven required, which means I can make it even when my kitchen feels like a sauna in July.
I made this for a coworker who once told me she did not like peanut butter desserts. She took a polite bite, went quiet for a moment, and then admitted she had been lying to herself for decades. We now have a standing agreement that I bring it to every office potluck.
Ingredients
- Chocolate sandwich cookies (200 g): Oreos are the classic choice here, and you want them crushed finely enough that no large chunks poke through the crust but not so fine that it turns to dust.
- Unsalted butter (60 g), melted: This binds the cookie crumbs together and helps the crust hold its shape when sliced.
- Cream cheese (250 g), softened: Let it sit out for at least thirty minutes because cold cream cheese will leave you with lumpy filling no matter how hard you beat it.
- Creamy peanut butter (180 g): Skip the natural kind that separates and go for a commercial creamy style like Jif or Skippy for the smoothest texture.
- Powdered sugar (100 g): This sweetens the peanut butter layer and helps thicken it slightly so it stacks neatly over the crust.
- Whipped topping (150 ml for filling, 200 ml for topping): Thaw it in the refrigerator overnight rather than on the counter so it folds in without deflating.
- Semisweet chocolate chips (120 g): Semisweet strikes the right balance against the sweet peanut butter layer, though dark chocolate works beautifully too.
- Heavy cream (80 ml): Combined with the chocolate chips, this creates a quick ganache that sets into a fudgy layer.
- Chopped roasted peanuts (30 g, optional): A scattering of these on top adds a satisfying crunch that contrasts with all that creaminess.
- Chocolate shavings (optional): Use a vegetable peeler on a chocolate bar for effortless curls.
Instructions
- Build the cookie crust:
- Toss the crushed cookies with melted butter in a bowl until the crumbs look like wet sand, then press them firmly and evenly into the bottom of a 23 cm springform pan. I use the bottom of a measuring cup to really tamp it down. Pop the pan into the freezer for fifteen minutes while you move on to the filling.
- Whip up the peanut butter filling:
- Beat the softened cream cheese, peanut butter, and powdered sugar together until completely smooth and lump free, scraping the bowl once or twice to catch any hiding bits. Fold in the whipped topping gently with a spatula, using sweeping motions so you keep as much air in the mixture as possible. Spread it evenly over your chilled crust.
- Pour on the chocolate layer:
- Microwave the chocolate chips and heavy cream together in twenty second bursts, stirring between each one, until you have a glossy, smooth ganache. Let it cool for about five minutes so it does not melt into the peanut butter layer, then pour and spread it gently over the top.
- Chill everything into submission:
- Cover the pan loosely and refrigerate for at least four hours, though overnight is even better because the layers firm up and the flavors deepen into something almost magical.
- Finish and serve:
- Spread the remaining whipped topping over the set chocolate layer and sprinkle with chopped peanuts and chocolate shavings if you are using them. Slice with a sharp knife dipped in hot water and wiped clean between cuts for the neatest looking pieces.
 Save
Save The first time I served this at a dinner party, conversation stopped entirely for a full minute after the first bites, and my friend David simply pointed at his plate and nodded at me with genuine reverence.
Swaps and Twists
I have tried folding chopped pretzels into the cookie base for a salty crunch, and the result was so good that my neighbor now specifically requests the pretzel version. Almond butter and cashew butter both work beautifully in place of peanut butter if you want to change things up, though the flavor will be milder and slightly sweeter. For a friend who avoids gluten, I used gluten free chocolate sandwich cookies and the crust was indistinguishable from the original.
Pairings and Serving Ideas
A tall glass of cold milk is the obvious companion here, and honestly it is all this dessert needs. I have also served small squares alongside strong coffee at brunch, and the bitterness of the coffee cuts through the richness perfectly. If you are feeling indulgent, a drizzle of warm caramel sauce over each slice turns it into something truly outrageous.
Storage and Make Ahead
This dessert actually improves after a night in the fridge, which makes it one of my favorite things to prepare a day ahead when I know I will be busy. Cover it tightly with plastic wrap or transfer slices to an airtight container and it keeps well for up to four days, though it never lasts that long in my house.
- Freeze individual slices wrapped in plastic and then foil for up to one month.
- Thaw frozen slices in the refrigerator overnight rather than on the counter so the whipped topping does not weep.
- Always store this chilled and serve it cold for the best texture and cleanest slices.
 Save
Save This layered delight is proof that you do not need an oven or fancy technique to create something that people will remember and request again. Just give it time to chill, slice it with a warm knife, and watch the room go quiet.
Recipe FAQs
- → Can I make this dessert ahead of time?
-
Absolutely. In fact, it benefits from being made the night before. The layers set beautifully and the flavors meld together after an overnight chill in the refrigerator.
- → What can I substitute for whipped topping?
-
You can use an equal amount of freshly whipped heavy cream sweetened with a tablespoon of powdered sugar and a splash of vanilla extract. Stabilize it with a teaspoon of gelatin if you want it to hold up longer.
- → How should I store leftovers?
-
Cover the pan tightly with plastic wrap or transfer slices to an airtight container. Keep refrigerated for up to 4 days. The cookie base may soften slightly over time but the flavors remain delicious.
- → Can I use natural peanut butter instead of creamy?
-
Regular creamy peanut butter works best for a smooth, stable layer. Natural peanut butter tends to separate and can make the filling oily. If you do use natural, stir it very thoroughly before incorporating.
- → Is it possible to make this gluten-free?
-
Yes. Simply swap the chocolate sandwich cookies for a gluten-free alternative. Many brands offer gluten-free chocolate sandwich cookies that work perfectly for the crust base.
- → Why is my chocolate layer not smooth?
-
Heat the cream and chocolate gently in short microwave bursts of 20 seconds, stirring well between each one. If the chocolate seizes, stir in a teaspoon of warm cream or butter to bring it back to a glossy consistency.
